DrillMaster, the Evolution of Military Drill
Click here for information on how to weight your Drillmaster iDrill RifleTM.
Why are this M1 Garand and M1903 wood rifle each called the DrillMaster iDrill RifleTM? Because “i” made it and that “i” belongs to you when you make it!
How to make your own practice rifle (M1 Garand or M1903) out of solid wood
I don’t recommend trying to make an M14 out of wood since much of the barrel of the rifle is exposed on the real thing; you just won’t be able to match that size and still have that part of the rifle be as strong as you need.
Either of these rifles are not intended to exactly match a fully weighted DrillAmerica, DrillMaster M14, Daisy Drill Rifle or demil. They are intended to help those who cannot afford their own rifle with which to practice. If you are creative, it may possible to bore a hole or holes in either rifle and fill it with some kind of material to weight it down. Whatever you choose, the rifle is yours!
Special note: The M1 pattern of the iDrill Rifle is a color guard/winter guard rifle. It’s just longer.
What you will need:
- 2” x 8” piece of wood: Yellow pine is the easiest to find, is sold in 8-foot lengths (you can make two rifles) and costs just under $5.
- Permanent marker (one with a wide wedge-like tip would be best)
- Scissors
- Scotch tape
- Tape measure
- Tools:
- Work bench
- Band saw*
- Circular or hand-held saw
- Router with rounding tip (I used a 3/4″)**
- Hand-held sander**
- Sandpaper
- File

*From the advice I was given at the local hardware store, a band saw will be the best option. Update: You can use a jigsaw with a long enough blade, but it will take much longer. I might just try this and see what works better.
**These items are not mandatory; however, they can help you greatly.
If you do not have access to a band saw and/or router, you are going to have quite a bit of work using the file and sand paper.
Directions
- Download and print the DrillMaster M1 Garand and M1903 iDrill RifleTM Patterns, the Medium-Height iDrill Rifle, and DrillMaster iDrill Rifle Jr pages
- Lay and tape the pattern together. Don’t overlap the paper, put the papers together ed-to-end. Be careful to not have any wrinkles in the paper.
- Carefully cut out the pattern.
- Lay the pattern on the wood and pin it to the wood using thumb tacks or something similar. Tape can be used, but will get in the way when you start tracing. Again, be careful to not have any wrinkles in the paper and make sure you have the whole pattern on the wood.
- Carefully trace around the image with the marker onto the wood. The arrows on the patterns are for the locations of the sling swivels (see the accessories link below).
- Remove the pattern.
- Repeat steps C, D and E for the other end of the 8-foot board.
- Using the circular or hand-held saw, cut the board in half so that you can work with one rifle image at a time.
- Use the ban saw to cut out the rifle. Try to leave about a 1/16th of an inch to sand away after using the band saw. Be careful to cut straight and slowly! If you make a mistake, you have the 1/16th of an inch to play with and you can sand-out the mistake. If you cannot sand-out the mistake, the routing portion of this project will not be as smooth.
- After the rifle is completely cut out, sand down all of the cut edges using something like 60 or 80 grit sandpaper. The lower number of the grit, the rougher and faster the sanding. The higher the number, the smoother the sanding.
- Note: whatever you do, don’t slam or tap the rifle on the ground! Doing so could chip off pieces of wood. See the pictures, I chipped two pieces off of the 1903- these can be wood glued back on, but I left them off and it doesn’t look good, but this is only cosmetic.
- After you have sanded the rifle to your version of perfection, use the router to round the edges of the rifle, or, manually sand to round the edges which will take much longer.
- Use sandpaper where needed to smooth the rifle.
- Wipe the rifle down with a wet rag to remove all of the saw dust
- Tape it (see How to Tape Your Rifle, below)
- Spin and enjoy your new DrillMaster iDrill RifleTM!
Accessories link: Click here for accessories for the rifle.

FYI: the M1 Garand s just like a color guard rifle only much longer and does not have the cutaway to add in the plastic bolt (see the accessories link above). The pattern has the cutaway line if you want to use it. You can also do this for the 1903. You can modify these rifles however you want- they are yours!
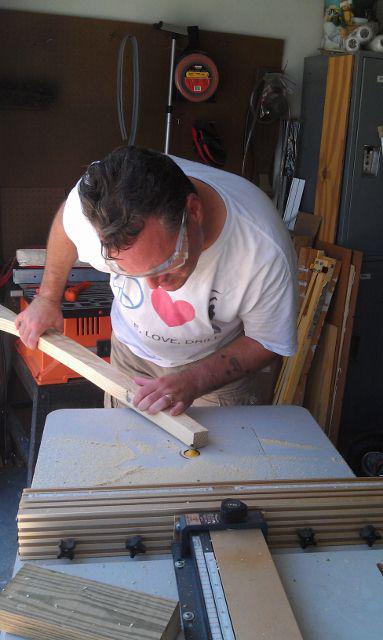
iDrill RifleTM Creation Process Pictures
(click on each picture to enlarge and see the pictures in sequence- some of the pictures have more detailed info for the creation process)
How to Tape Your Rifle
You really should tape your rifle, at least at the stress points. This PDF file from colorguardeducator.com is a super guide for taping a color guard rifle.
The butt and “barrel” ends of the iDrill RifleTM are also stress points and they need to be taped to prevent splitting.
What you will need:
- Strapping tape (with fiber in it, like for shipping boxes) to tape the stress areas and ends.
- Colored vinyl tape (I bought 60 feet of Scotch brand electrical tape and had enough.
- Scissors.
- Cosmetic cotton rounds, cotton pads (not cotton balls), or even a feminine protection pad (yep, I used one on each and you can see it in one of the pics) or something to add as cushion on the butt and barrel ends of the rifle to help it keep from splitting.
The Process:
- Use the strapping tape to add support to the ends and the two stress points.
- Tape on your padding for the ends. Make sure the padding is shaped to each end and does not overlap around an edge.
- Starting at the butt of the rifle (see the pictures below), apply your tape and carefully wind it around until you reach the end- finished! Don’t “over tape” your rifle. You can add weight to different places depending on how much you add, but that also adds thickness.
DrillMaster iDrill Rifle, wood rifle, tape a rifle, make a rifle, home made rifle, M1 Garand, Springfield M1903, wooden rifle, how to make your own drill rifle, how to make an honor guard rifle out of wood, how to make a rifle out of wood
Comments 16
Your page is BROKE. Not a single link works, Not helpful to anyone when it can’t be used as intended.
Author
Mr. Minett,
Breaks happen, that’s part. Letting me know of broken links is helpful, complaining isn’t helpful.
Yea, the links are still not working, but if you click on the Picture with the Drill members in it, that takes you to the directions
Author
All the links have been updated. Thank you.
looks like your link to the plans are broken
Author
Thank you. Fixing right now.
What is the general weight of the iDrill rifle?
Author
Around 2 lbs each. You can get weights to add from Harbor Freight. See the article here: http://drillmaster.wpengine.com/2012/07/09/weighting-the-drillmaster-idrill-rifle/
DrillMaster
hi, is the competition eligible to people outside the us?
Author
Yes, anyone!
by the way, i have posted my video for the competition at this link : http://www.youtube.com/watch?v=14g-QbjBhZg
Author
That is great, Auyok!
sir i would really like to say thank you for everything you’ve posted it has all been a big help to me learning how to train and lead my own J.R.O.T.C. armed exhibition team.
I’ve also started a small blog on tumblr.com for military style drill and was wondering if you’d mind if i shared some of things on your site? Again thank you for everything.
Author
Wilson,
Thanks very much for the compliment! It’s cadets just like you that make all of this worthwhile. It’s my absolute pleasure to serve the military drill world! By all means share the info here as long as you credit.
There is much, much, much more to come!
DrillMaster
Woah. This is neat.
Author
Hi Cris,
Thanks!
DrillMaster